Neo Load Performance testing Tool

Neo Load is a load and stress testing tool to measure the performance of web and mobile applications
A load testing tool by Neotys.
A tool that measures performance and behaviour of the system under load.
Used for testing web applications, Web services, flex applications Oracle forms and Silver light applications.
Uses Java Script for script enhancements.
System Requirements:
- Neo Load is compatible with all web servers and web application servers: J2EE, .NET, PHP, ASP, CGI, AJAX, SOAP, etc...
- Neo Load (Controller and Load Generators) is compatible with: Windows 7, Vista, XP, 2000
- 2 GHz processor and Minimum 1 GB RAM.
Neo load Testing Terminologies:
- Vuser Script: The script which mimics a single user activity on the application. This is done by capturing the Http traffic between browser and server.
- Container: A group of Http requests that represents a single user action.
- Population: This defines the number of users.
- Scenario: This shows the number of users, run pattern and various other runtime settings to mimic the real world load test
Our Test will follow 3 phases:
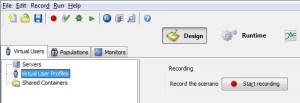
- Recording the Test Scenario.
- Running the test.
- Test Results.
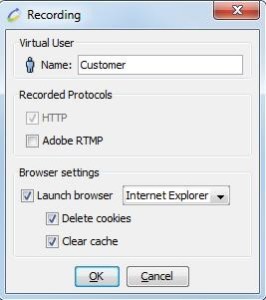
a) Browser settings: From this pop up user can select different types of browsers
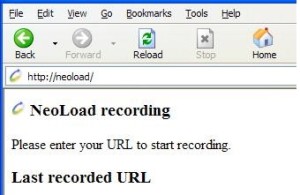
b) Entering the URL to be recorded: Here the browser is now ready to record the scenario, Enter the URL of the site to be tested and browse as normal
c) Add Container: Containers represent the business transactions within your scenario

d) Stop the Recording: After completion of user requirement means which functionality need to do for load testing then stop the recording using stop button present on the tool bar.
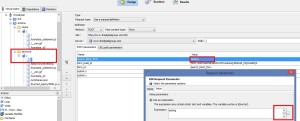
e) After completion of script recording we do major enhancements like parameterization and correlation
Parameterization:
- Script recording is successfully done
- Click on Username/Password (or) user entered keyword
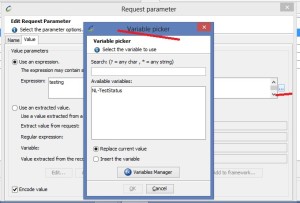
- Click on browse button or 3 dots button in request parameter popup
- Variable picker popup is displayed
- Click on variable manager button
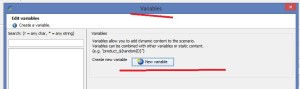
- Edit variables popup is displayed
- Click on a new variable link
- Create variables popup is displayed
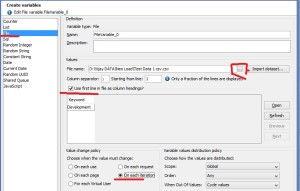
- Select File option from variables
- Upload CSV file which contains test data/username/passwords
- Select Use first line as column heading checkbox this will select 1 row as first input data
- Select on each iteration option
- Click on ok button
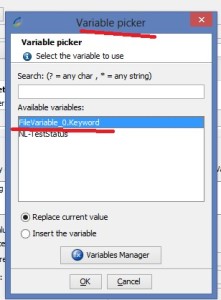
- The parameter name is displayed in Variable picker popup
- Click on ok button
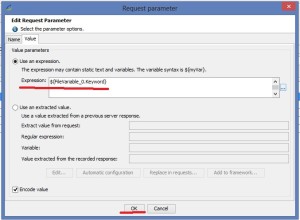
- Parameter name is displayed in Request parameter with ${ }
- Click on ok button
- Value is replaced with parameter name.
- For more understanding refer below screenshots.
Step 1:
Step 2:
Step 3:
Step 4:
Step 5:
Step 6:
Step 7:
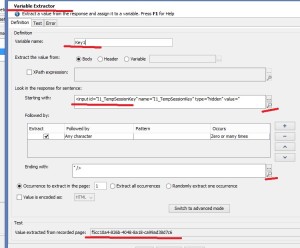
Correlation:
- Find out dynamic value from the vuser script
- Go to the previous request of dynamic value present in the link
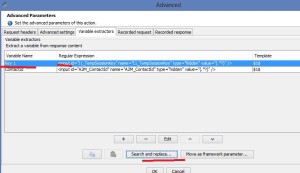
- Click on advanced button
- Advanced parameters popup is displayed
- Click on the Recorded response
- Find out dynamic values with proper left and right boundaries
- Left and Right boundaries are available for dynamic value
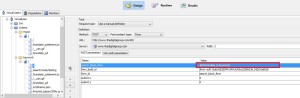
- Click on variable extractors to correlate and create parameter
- Variable is created successfully
- Select Extracted variable / {Key1} then click on search and replace
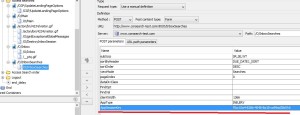
- Dynamic values are replaced by extracted variable name/parameter name
- Go to next request
- Check the dynamic value is replaced or not.
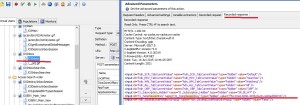
- Run the script
- Vuser script is running successfully with new dynamic values
- For more understanding refer below screenshots.
Step 1:
Step 2:
Step 3:
Step 4:
Step 5:
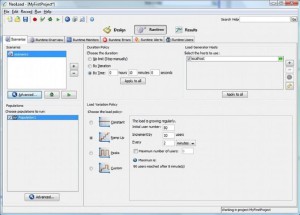
2) Running the test.
- Add populations
- Select local host monitoring agent
- Give No.of simulated users
- Give No.of iterations
- Give load test duration, ram up and ramp down time
- Connect Load generator machines for generating the load
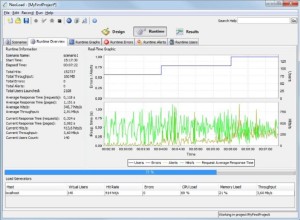
- User can monitor graphs at the time of execution in run time viewer and run time graphs
Create populations: A population is a group of virtual users

Scenarios tab: In scenario tab we can give load test duration, ramp up and ramp down timings.
The Run time Overview tab:It provides immediate statistics such as hits/sec., average response time and errors
3) Test Results:
- Click on Test summary tab
- Verified summary of results
- Import all the test results in word file.
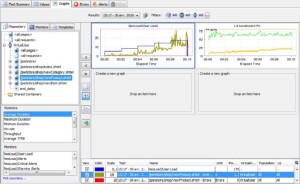
a) Test Summary tab: The test summary provides general statistics for the test, including total test duration, throughput, total number of hits, number of errors and average response time.

b) Graphs tab: The "Graphs" tab can be used to plot a graph curve for any statistic in any request. Simply select the required statistic among average response time, hits/sec.
Conclusion:
Prepare excel sheet for all values and analyzing results
- Performance test reporting is the process of presenting results data that will support key technological and business decisions.
- The key to creating effective reports is to consider the audience of the data before determining how best to present the data.
- The most effective performance-test results will present analysis, comparisons, and details behind how the results were obtained, and will influence critical business decision-making.
Write a comment
- shravan December 28, 2016, 10:56 amNice :)reply
- ??????????? December 9, 2015, 2:18 pmHeya i'm for the first time here. I found this board and I find It really useful & it helped me out much. I hope to give something back and aid others like you helped me.reply
- Bhaskara Reddy November 30, 2015, 3:34 pmawesonereply
- Satya Pakalapati November 30, 2015, 1:24 pmThanq so much Vijay! Good stuff n detailed guide for new people. -Satyareply
Subscribe To Our Newsletter
Join our mailing list to receive the latest blogs and updates.