How face detection is implemented using python?

Today most of the graduates will be working in Corporate companies. Irrespective of the age of the organization, every person needs to intimate to HR/ admin department regarding his/her time of reporting to work. In the olden days, organizations used registers. But due to an increase in the number of employees in organizations today, this approach is no longer effective. Instead, the organizations today have implemented advanced techniques like fingerprint access and so on. Leading HRMS software available in the market today are designed to integrate data from fingerprint access systems as well as biometric systems.
However, the fingerprint access method cannot give instant information, which made organizations to switch to advanced technologies like face detection. Nowadays, in many of the companies, face detection is used to admit employees within the organization. So, in this article, I'm going to explain how face detection is implemented using Python.
But before we get started, let’s have a clear understanding about the concept of face detection and how it works.
What is face detection?
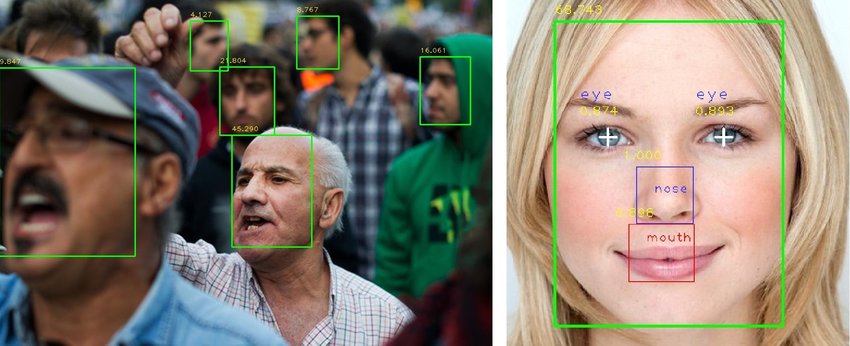
Source: https://bit.ly/2ERMpW5
Face detection is a computer vision technology. With digital images, the computer detects the faces. In general, this is very common for humans. But computers do not easily identify like humans. So the computer requires a sequence and series of steps to recognize the face.
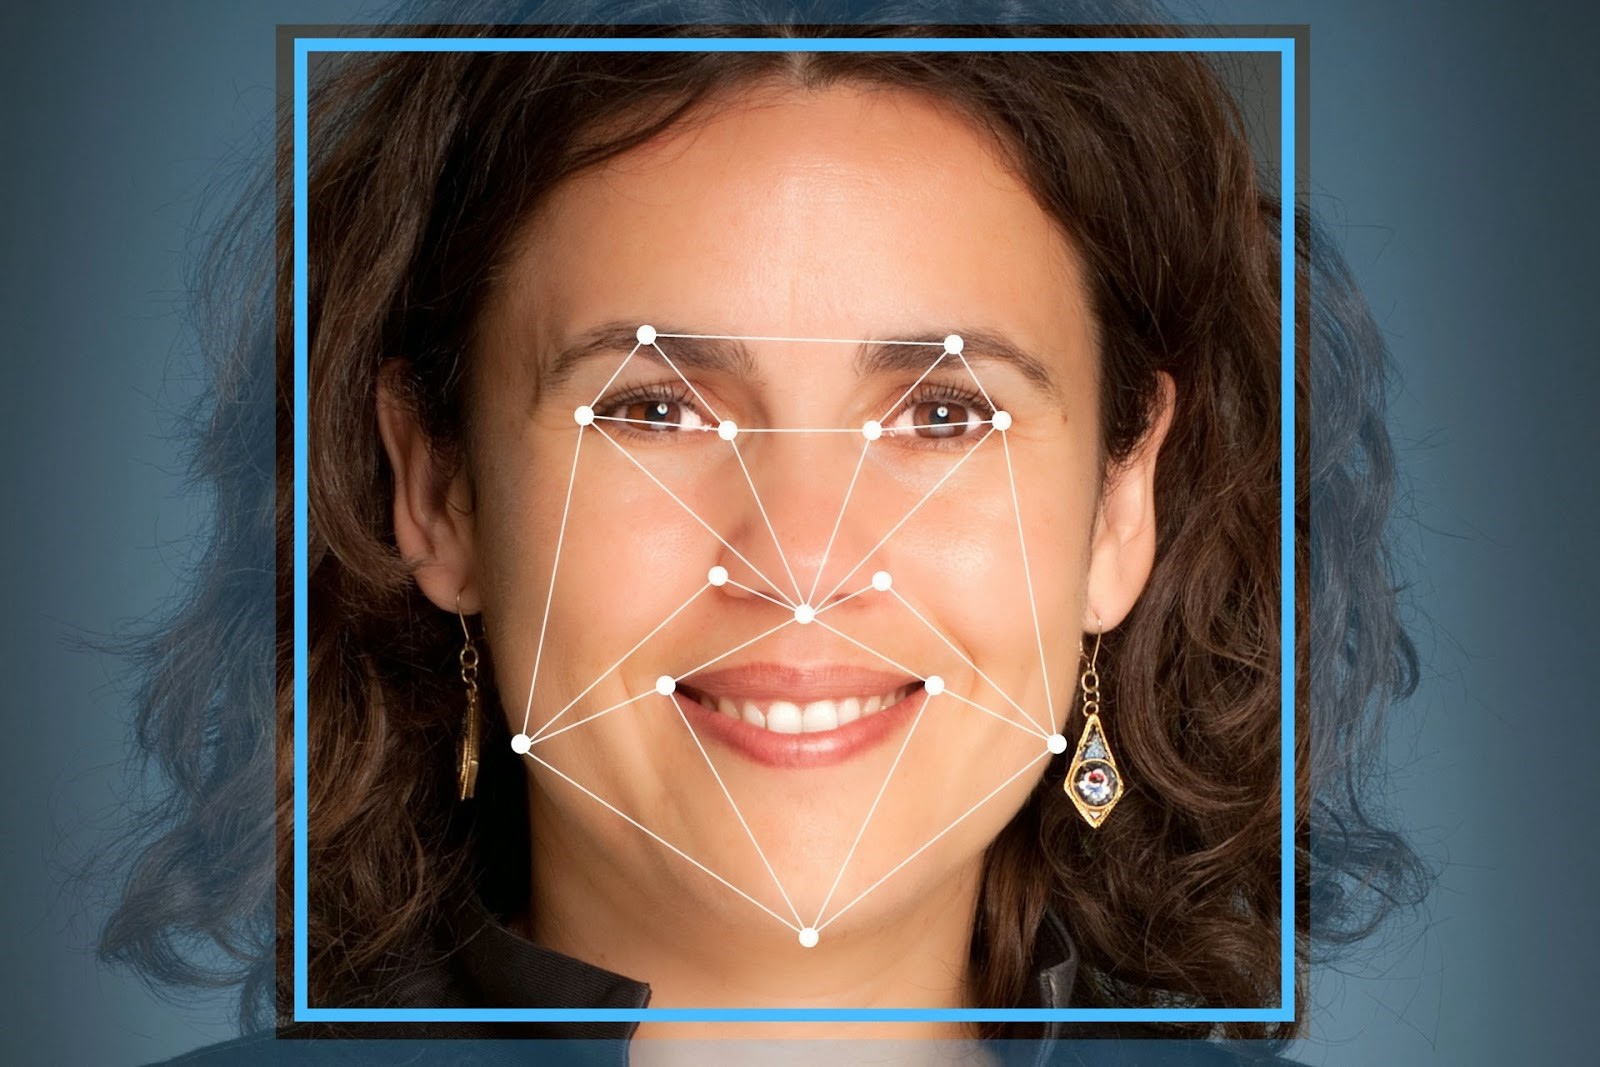
Facial recognition:
This involves identifying the image face that belongs to image A but not to image B. Facial recognition is applied in biometric purposes like smartphone unlocking
Facial analysis:
This analysis is useful in analyzing certain facial features like age, gender and/or emotion.
Facial tracking:
This is mostly present in video analysis and involves trying to follow a face and its features from frame to frame. The common example of facial tracking is a snapshot, which uses various filters.
Now, let us try to find answers to some common questions:
How does the computer see images?
Pixel is the smallest element of the picture. It is basically a dot in a picture. An image contains multiple pixels arranged in rows and columns. For instance, we usually see the resolution as X* Y where X stands for the horizontal pixels width and Y stands for the vertical pixels width. But the computer does not understand the pixels as dot colors., but only understands the numbers effectively. To convert the colors into numbers, the computer uses various color models.
Usually, the RGB model is used to represent the color images. RGB stands for Red, Blue, and Green. Since the computer understands only numbers., every pixel is represented in terms of numbers (combining red, blue and green in various amounts). In a grayscale image, each pixel is a single number representing the light (or) intensity amount it carries. In many applications, the intensity ranges from 0 to 255. (0- black and 255- white), as shown below.

So now, let’s learn about the Features
What are Features?
A feature is an information piece that is relevant to solve a certain problem. It can be as simple as a single pixel value (or) more complex to include corners, edges, and shapes. Moreover, you can combine multiple simple features into a complex feature.
Now let us discuss the implementation of the framework
How face detection is implemented using Python?
Two researchers named Viola and Jones proposed a framework for face detection and these guys have implemented the algorithm in 4 steps, as mentioned below:
Selecting Haar-like features:
For a given image, the algorithm looks at many smaller regions and tries to find a face by looking for the sub-region special features. Since an image contains various size features, the user needs to check many different positions.
Haar-like features:
All human faces share some similarities. When you at the photograph of the face, the eye region is darker than the nose bridge. Likewise, the cheeks are brighter than the eye region. And if the image contains the human face, we can use these properties.
Source: https://bit.ly/2u9b5EF
Simply put, to be able to find out which region is lighter (or) darker is, to sum up the pixel values of both the values and compare them. python online training says pixel values in the darker region will be smaller than the pixel values in the pixels in the lighter region.
This feature is represented by taking the rectangle part of the image and then diving the image into multiple parts. This is often visualized using black and white adjacent rectangles, as shown below.
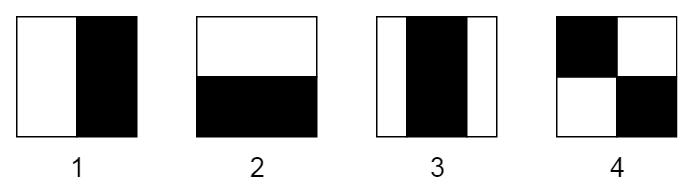
In the above example, the first two is useful for detecting edges. The third one detects the lines and the final one is useful for finding the diagonal features. The drawback of this approach is that it is computationally expensive. Hence, the Internal Image approach is more commonly used.
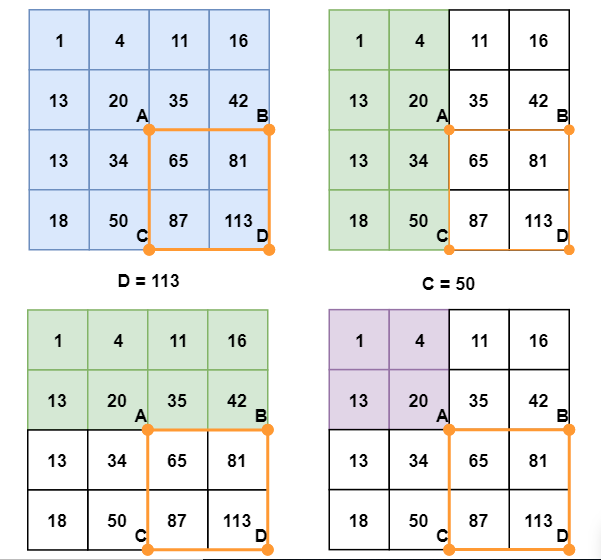
Internal Image:
This is also known as a summed image. It is the name of both the data structure as well as the algorithm used to obtain the data structure. It is usually used as a quick and efficient way to calculate the pixel values in the image (or) a rectangular part of the image. In an internal image, the value of each point is the sum of all the pixels above to left including the target pixel.

The internal image can be calculated in a single pass over the original image. So regardless of the rectangle size, this ultimately reduces the pixel intensities within the rectangle. This includes operations out of four numbers. In the rectangle ABCD, pixel sum is calculated for the points A, B, C and D using the formula D -B-C+A. This is illustrated in the diagram below.

In case you’re wondering which feature (or) size is used to find the image size. We used a machine learning algorithm called boosting. This is helpful in finding a particular image pixel.
If you are interested to learn Python, enrol for a training session or even sign up for a free demo.
Write a comment
Subscribe To Our Newsletter
Join our mailing list to receive the latest blogs and updates.